The following are my findings after spending half a day with THREE failed units out of the six I applied the upgrade from 1.0.22 to 2.0.4.0.
This should be a last ditch effort to get your WAP200 working again, after trying the 30/30/30 settings recovery method and whatever else you can find on the net. YMMV.
You can recover this failure, but it will take some expertise and knowledge.
The following is needed:
– RS232 to TLL level shifter 3.3V (I used a PL2303 based clone from Ebay costing about $5,- incl. shipping)
– Philips #2 screwdriver, hobby knife
– Soldering iron
– 2 x 4 PIN header 2.54mm spacing
– Computer with TFTP server installed, configured at 192.168.1.200
– Firmware from Linksys / Cisco – I used WAP200-FW-2.0.4.0-ETSI-K9.img
Procedure
- Remove the four rubber feet from the unit, carefully peeling them off with the help of the hobby knife
- Unscrew the four screws in the bottom
- Remove the lid – take care of the four tabs (one on each side, slide something between lid and base, it will easily pop off)
- Remove motherboard from base, take care not to yank the antenna cables
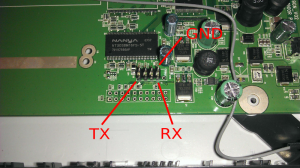
- Solder the 2 x 4 PIN header to the J1 connector (pinout below)
- Put the motherboard back in the base
This was the hardware modification phase, the rest is software:
- Connect your RS232 level shifter to the J1 connector
- Connect ethernet cable from your computer to the WAP200 unit
- Fire up any terminal emulator you feel comfortable with, the settings are 38400/8N1, no handshaking
- Power on the WAP200 and watch the bootloader text appearing
You can now confirm whether your problems are due to a bad flash or not. If it is due to a bad flash, you’ll see a message with “Checking CRC ….” and then a failure. If that is the case, proceed:
- Power cycle the unit, and be ready to press any key when prompted, you have two seconds to stop the automatic boot process.
- You should end up with an “STR9100>” prompt …
At the prompt issue the following commands
STR9100> tftpboot 100000 WAP200-FW-2.0.4.0-ETSI-K9.img
This loads the firmware file from your TFTP connected server from 192.168.1.200 to the units RAM 0x100000 (WAP200 has IP address 192.168.1.245)
STR9100> cp.b 100000 10040000 1FFFFF
This writes the downloaded image from memory location 0x100000 to the flash area 0x10040000
If the above worked as expected you can either power cycle the unit, or issue the command:
STR9100> go 10040020
When the WAP200 boots, you should end at a busybox shell. Your settings should be preserved from before the bad flash, but you can reset to factory settings by issuing:
# nvram erase
# reboot
You can finish by reassembling the WAP200 and patting yourself on the back.
Good luck.

hej
ligger du inde med
wap200-fw-2.0.6.0-etsi-k9.img eller nyere firmware til cisco wap200?